Solve: The Site Is Experiencing Technical Difficulties
by
7-layers of Security for Your WordPress Site
Your website needs the most comprehensive security to protect it from the constant attacks it faces everyday.
“The site is experiencing technical difficulties” error can feel frustrating. Just when you’re about to update a plugin or upgrade your PHP, this pesky problem appears. And sometimes, it locks you out of your own admin panel, leaving you in a fix. It can be frustrating, especially since troubleshooting becomes trickier with these blockades. But fear not, the fastest way to break through this wall is to restore a backup.
Once your site is back and breathing, it’s time to dive into problem-solving mode. This article will be your guide, showing you exactly what steps to take. With helpful tips and easy instructions, you’ll soon have that error vanishing in no time. Let’s get your WordPress site running smoothly again, stress-free and in no time!
TL;DR: This error is caused by PHP limits or plugin/theme conflicts. Fixing it involves changes that might affect your site’s functionality. To ensure your live site remains stable and users aren’t disrupted, test and resolve the issue on a staging site first.
Understanding “The site is experiencing technical difficulties” error
Think of your website like a factory assembly line. Each part must work perfectly for products to be made and delivered to customers. This error is like a jammed conveyor belt—production stops, and your customers don’t get what they want.
In WordPress, this error means your site has hit a snag with the rendering of the code. The snag is bad enough to make the site inaccessible to both visitors and admins. This can be worrisome as it blocks people from seeing or using your site. Any downtime, is bad downtime.
The error usually occurs due to:
- PHP errors: PHP is the script language powering WordPress. Errors often arise from mistakes or conflicts in the code. For example, updates or adding new plugins can trigger this error.
- Memory limit exhaustion: Every PHP process is allocated a certain amount of memory on your server. If a process needs more than it’s given, it can’t proceed. This usually happens during resource-heavy tasks like full backups.
Before the troubleshooting
Before diving into troubleshooting, it’s essential to take some precautions. This is to avoid making the error worse than it already is. These steps will help you reduce further impacts on your site while you work on fixing the problem.
- Restore a backup: Start by getting your site live again. Restoring a backup is the best way to minimize downtime. Use a plugin like BlogVault for this task. Go to the backup section in the BlogVault dashboard and click Restore. With one click, your site will soon be back online.
Pro tip: If you can’t access your dashboard, you can still restore a crashed site. Use BlogVault’s emergency connector feature. It helps connect to your site’s backend, ensuring swift recovery.
- Clear cache: Sometimes, cached data can cause temporary issues like this error. Clear your cache using your caching plugin or a performance plugin like Airlift. Don’t forget to clear cached images and files in your browser settings as well.
- Enable WP debug: Turn on WordPress debug mode to spot underlying problems. Access your wp-config.php file through FTP or your host’s file manager. Look for the line:
define('WP_DEBUG', false); Change false to true. Reload your site to see error messages. Once done, change it back to false to keep errors hidden from visitors.
- Check your activity log: Examine your WordPress activity log for recent changes. This log can show if a plugin update or new theme caused the error. Tools like BlogVault can track these activities and help spot what led to the issue.
- Create a staging site: Use a staging environment to test fixes without affecting your live site. While MalCare’s free plan offers a suite of security features, a paid subscription will give you benefits like 1-click staging. Just log into MalCare and find the staging section in the dashboard. Click Add Staging and wait a few minutes. This creates a safe place to try solutions before applying them to your live site. Then, repeat the steps that triggered the error. For example, if an Elementor update failed and triggered this error, repeat it on the staging site.
Solution 1: Update PHP
Upgrading your PHP version is essential for performance, security, and compatibility. It can bring improvements that enhance your site, but it must be done with care. Here’s a simpler guide to help you through the process:
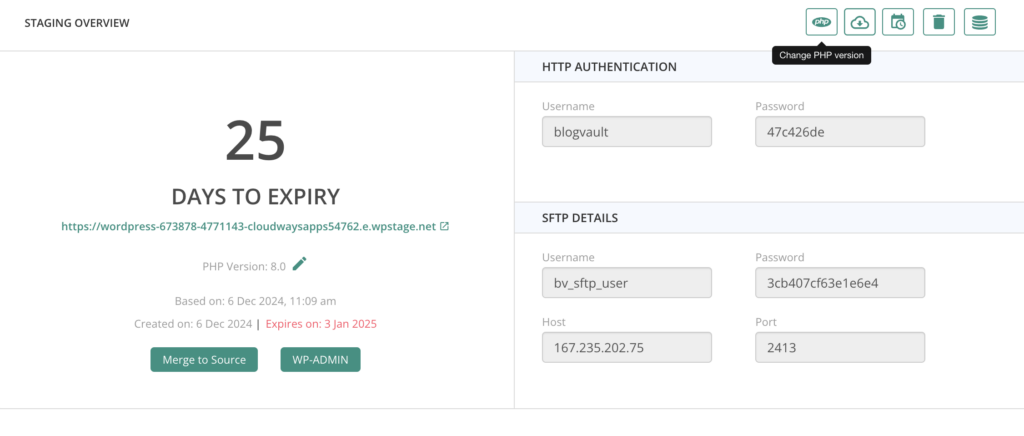
Step 1: Update PHP on a staging site:
Before making any changes on your live site, try them on a staging site. This way, you can see how the new PHP version affects your site. In the MalCare dashboard, click Details. Look for the PHP icon at the top and choose the PHP version you need.
Step 2: Test Thoroughly:
Upgrade PHP on your staging site and conduct thorough tests. Visit different pages, fill out forms, check plugins, and make sure integrations like analytics work. Check to see if the error has been fixed. If everything is running smoothly, move to update the live site.
Step 3: Update PHP on Your Live Site:
You can update PHP through your web host account. For the sake of this article, we’ll show you how to do it on Cloudways, but other hosts have their own instructions.
- Go to the Cloudways website and sign in with your username and password.
- Navigate to the top and click on the Servers tab to see your server list.
- Find and click the server hosting your application to get into management settings.
- On the dashboard, find Settings & Packages in the left menu.
- Switch to the Packages tab. Here, you can see your current PHP version.
- Click Edit next to PHP. Pick the desired version, like PHP 8.0 or 8.1.
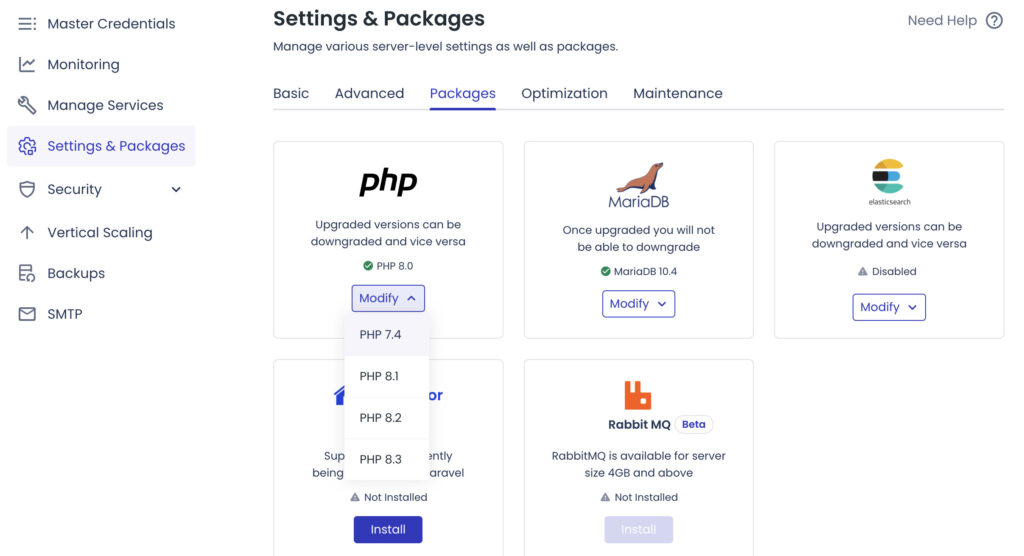
- Apply the changes. Cloudways will take a moment to update PHP on your server.
Step 4: Test Changes Again Testing again is key after updating PHP on your live site. Ensure everything operates as expected. We had an issue with Google Tag Manager post-update, so don’t skip this step. Check everything you can think of.
Solution 2: Increase PHP memory limit
When your WordPress site runs into tasks needing more memory than available, errors can pop up. Increasing the PHP memory limit often fixes this. Here’s a streamlined guide using Cyberduck and FTP:
- Open Cyberduck and connect to your server with your staging site’s FTP credentials. You will need a public IP address, username and password. You can find these credentials on the Details page in BlogVault’s staging section.
- Once connected, go to the root directory of your WordPress site. This is often named public_html. Find the wp-config.php file here.
- Download the file and open it with a text editor. Locate the line saying
/ That's all, stop editing! Happy blogging. /Just before this line, add:
define('WP_MEMORY_LIMIT', '256M/code); This raises the limit to 256 megabytes. Adjust this number as needed for your site.
- Save your changes, then upload the edited wp-config.php back to your server. Overwrite the existing file if prompted.
- Visit your staging site to ensure it runs smoothly. Check for better performance or resolved errors due to the memory increase.
If this fixed the error on the staging site , apply the same changes to your live site
Solution 3: Identify plugins and theme conflicts
Conflicts between plugins or themes are often culprits in errors. Theme updates fail and cause a lot of issues. Other updates may conflict with the existing versions of a theme or plugin. These conflicts can disrupt site functionality, leading to error messages or unexpected behavior.
- Open Cyberduck and establish a connection to your staging site server . Use the SFTP credentials you find on the staging section of your MalCare dashboard.
- Once connected, navigate to your WordPress installation’s root directory. This is often called public_html. Then, open the wp-content folder. This folder contains subdirectories for your plugins and themes.
- Inside the wp-content/plugins directory, you can rename individual plugin folders. FOr e.g., plugin-name to plugin-name.old) to disable them. Begin by disabling all plugins to see if the conflict resolves. If the issue is resolved, re-enable plugins one by one by reverting their folder names. Test your site each time to identify the problematic plugin.
- If plugins are not the source, navigate to the wp-content/themes directory. Repeat the last 4 steps but with the theme folders.
Once you identify the conflict, you have a few options. If it was recently updated, revert the update to see if that helps. If it wasn’t updated, reach out to the developers to fix the issue. You may have to temporarily disable the plugin.
Solution 4: Fix database issues
Database issues can cause significant problems for your WordPress site, such as this error or the “Error Establishing a Database Connection.” Here’s how you can address these issues and bring your site back online efficiently:
- First, ensure your database credentials are correct. These details are stored in your site’s wp-config.php file. Use an FTP client like Cyberduck to access your server and find this file in the root directory. Open it and check that the database name, username, password, and host match those provided by your web host. The relevant lines look like this:
define('DB_NAME', 'database_name_here');
define('DB_USER', 'username_here');
define('DB_PASSWORD', 'password_here');
define('DB_HOST', 'localhost');
Ensure these values align with the database credentials on your hosting account.
- Sometimes the issue lies with the database server. Check with your hosting provider for any server problems or outages. You can also try connecting to the database using a tool like phpMyAdmin from your cPanel.
- A corrupted database can cause connection errors. WordPress offers a built-in tool to repair the database. To use it, add this line to your wp-config.php file:
define('WP_ALLOW_REPAIR', true);- Visit the URL http://yourwebsite.com/wp-admin/maint/repair.php to access the repair page. Follow the available options to repair and optimize your database. After the repair, remove the line you added to the wp-config.php file to secure your site from unauthorized access.
Solution 5: Rectify syntax errors
If you’ve recently edited core files on your WordPress site, syntax errors could be the culprit behind your site issues. Such errors might include missing punctuation, extra spaces, or incorrect code, leading to problems that can take your site offline or cause specific error messages.
To fix syntax errors, carefully review your code for any typos or misplaced characters. A good practice is to use a code editor with syntax highlighting. This tool can help you quickly spot and correct mistakes by visually marking errors.
If you’ve tried all troubleshooting steps and still face issues, it’s time to reach out to your hosting provider. They have access to server logs and in-depth server settings, crucial for diagnosing problems beyond typical WordPress configuration fixes. Their expertise can help get to the bottom of issues and resolve them effectively.
Preventing “The site is experiencing technical difficulties” error
Encountering errors like “This site is experiencing technical difficulties” can disrupt your site’s functionality. To reduce impacts in the future, adopt proactive measures.
- Take regular backups: Automatic website backups are essential to protect your content and settings. Use a reliable plugin like BlogVault to automate this process. Having recent site versions on hand helps you reverse changes quickly and minimize disruption.
- Use a test site: A test site allows you to test changes safely before going live. By using a staging site, you can identify and fix issues without affecting your audience. This ensures stability and prevents downtime when updates are launched.
Final thoughts
Dealing with errors that cause site downtime can be quite disruptive, but you can lessen the impact by being proactive. Regular site backups are crucial. With tools like MalCare, you can automate these backups to ensure there’s always a current version available for restoration. This quick access to backups helps reduce downtime and keeps your content intact, allowing you to swiftly restore your site when issues occur.
A staging site is also invaluable. It acts as a safe space for testing solutions and troubleshooting errors without affecting your live site. By experimenting on a staging site, you ensure any fixes are effective and problem-free before going public. This approach protects your live audience from disruptions and keeps your site’s performance steady. By integrating these strategies, you minimize downtime and maintain your site’s integrity.
FAQs
What is the “Site is facing difficulties” error?
The “Site is facing difficulties” error appears when your site encounters an internal problem. It indicates that there is a disruption preventing the site from functioning correctly. The disruption makes it inaccessible to visitors and admins.
How do you fix the site is experiencing technical difficulties error?
To fix this error, start by restoring a recent site backup. Then, troubleshoot by checking for plugin or theme conflicts, increasing the PHP memory limit, or addressing database issues. Using a staging site for testing changes can help ensure fixes don’t affect your live site.
What causes technical difficulties?
Technical difficulties arises from PHP errors, memory limit exhaustion, plugin or theme conflicts. Updates to WordPress or its components can make code become incompatible or eat up too many server resources.
What to do if a site crashes?
If your site crashes, first restore it from a recent backup to get it back online quickly. Next, troubleshoot to find the cause of the crash. Checking server error logs, enabling WP debug, and methodically disabling plugins or themes can help pinpoint the issue.
How to troubleshoot WP errors?
To troubleshoot WordPress errors, begin by identifying recent changes made to the site. Use WP debug to gather more information about the error. Disable plugins and themes to check for conflicts, increase the PHP memory limit if needed, and ensure your database is functioning properly. Always test solutions on a staging site when possible to avoid affecting the live site.
Category:
Share it:
You may also like
WordPress Nonce – All You Need To Know About It
Ever clicked a link on a site and gotten a confusing error message instead of the page you expected? Maybe you were trying to submit a form or delete a…

2 Simple Fixes For index.php File Corrupted on WordPress Site?
Dealing with broken links and jumbled pages is not fun, and it’s definitely not what you want your visitors to see. A corrupted index.php file is a common reason for…
How to Check if Google is Indexing My Site? – 4 Easy Methods
You just launched a shiny new site. You’ve put in hours crafting content and setting it all up. Now, you eagerly wait for it to appear in Google search results….
How can we help you?
If you’re worried that your website has been hacked, MalCare can help you quickly fix the issue and secure your site to prevent future hacks.

My site is hacked – Help me clean it
Clean your site with MalCare’s AntiVirus solution within minutes. It will remove all malware from your complete site. Guaranteed.

Secure my WordPress Site from hackers
MalCare’s 7-Layer Security Offers Complete Protection for Your Website. 300,000+ Websites Trust MalCare for Total Defence from Attacks.